Showing posts with label Workshop. Show all posts
Showing posts with label Workshop. Show all posts
Saturday, April 5, 2014
Newest Fleet
Tuesday, April 1, 2014

Sunday, March 30, 2014

Friday, March 28, 2014
Fixed Wing Frenzy!

Sunday, March 23, 2014
A Quick Fix

Here is a Caproni CA-1 I whipped up this weekend. As usual the fusil lodge and tail struts are made from toothpicks, the wings and tail are made from an old bank card I had to cut up.
Sunday, March 2, 2014

Tuesday, June 12, 2012
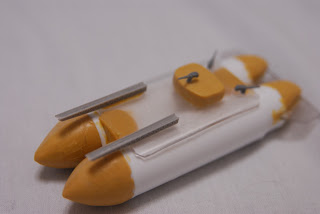
New Dig
I know it has been quite a long time since I last posted. But fear not for I have returned, and brought with me a magnificent new creation. My newest creation is a twin gas bag dirigible carrier/sea plane tender. It's nation of allegiance is yet to be determined, but it could well have been swayed to an anarchist cause! You may also note that this image is much better than many past due to a new macro lens. With the aid of this new device I may soon post updated images of the entire fleet.


Friday, October 3, 2008
Resin Casting Continued
In this part of the demo I will show how to cast the actual miniatures. Now I was out of uncast resin and the local hobby shop was as well. So I had no resin to do a new casting but I will try to explain how to do it any way.
 Step two Let the resin sit and dry for about ten minutes, it gives off heat as it sets so be careful not to burn your self. Once the resin has set and cooled flex the mold and pop out the model. It may have small holes in it, don't worry these can be filled with various types of putty or GW green stuff.
 Step three once your model is in shape (note the green patch where an air bubble was) You can get into fine details. I like to add "gun sponsions" or small swivel guns to the superstructure. These small details don't cast well so I add them after that step. I use a small drill to drill holes where the guns will go. It is possible to go further and cast separate components such as large turrets or superstructures and add these to your ship (This mould be ideal for a monitor). This lends detail and complexity to the design but can be very tricky to get right.
 You can see here the holes drilled into the side of the superstructure.
 Lastly cut small pieces of paper clips and fit them in as guns, the same can be done for masts. Now you can paint and base and you are ready to go. As a final warning I will say not all castings will be usable many of mine have failed and your first few might be failures but keep going you will get it in time.
 Step one take your mold out and make sure it is clean. Mix the two different halves of liquid resin in a separate cup. Pour it slowly in to the mold. It helps to use a tooth pick to stir it around and fill all the corners and small bits
 Step two Let the resin sit and dry for about ten minutes, it gives off heat as it sets so be careful not to burn your self. Once the resin has set and cooled flex the mold and pop out the model. It may have small holes in it, don't worry these can be filled with various types of putty or GW green stuff.
 Step three once your model is in shape (note the green patch where an air bubble was) You can get into fine details. I like to add "gun sponsions" or small swivel guns to the superstructure. These small details don't cast well so I add them after that step. I use a small drill to drill holes where the guns will go. It is possible to go further and cast separate components such as large turrets or superstructures and add these to your ship (This mould be ideal for a monitor). This lends detail and complexity to the design but can be very tricky to get right.
 You can see here the holes drilled into the side of the superstructure.
 Lastly cut small pieces of paper clips and fit them in as guns, the same can be done for masts. Now you can paint and base and you are ready to go. As a final warning I will say not all castings will be usable many of mine have failed and your first few might be failures but keep going you will get it in time.
Thursday, October 2, 2008
Resin Casting
I received an inquiry a while ago as to how I do my resin castings. It took me a while to get around to it, but I finally did, and here it is. Or at least the first part. this part will show you how to make a vulcanized rubber mold.

Step one is to make or find a suitable ship. First it heeds to have a flat under side. and second it you made it out of wood such as this one its best to spray it with a thick coat of clear lacquer of finishing spray to seal the surface so nothing will soak in and it will slide out of the mold more easily. On another note it fills the uneven splinters and wood grain on wooden ships such as this one.
 Step two is to glew the ship to a piece of paper (hints the flat under side) this keeps the ship from floating to the top of the rubber solution.
 Step three build a barrier around the ship to create the edges of the mold. legos work well as seen above.
 Step four mix the rubber and catalyst then slowly pour over the model. Make sure you fill the rubber a few millimeters above the highest part of the model. Let sit for about five hours to harden completely.
 Step five after waiting a few hours test to see if it is hardened. It should be solid and dry but somewhat flexible. If so remove the legos or other casing.
 Step six tear off the paper and test under side for hardness.
 Step seven carefully remove model from mold by flexing the mold until model pops out. The first time is often tricky, and if the rubber tears slightly that is fine, but be careful. Now you have a mold that should be good for about 100 castings. In time it will wear and likely break so hang onto the master if you are planning on making a lots. Good luck and God speed.
Subscribe to:
Posts (Atom)